
-
Why glass matters: history and basics3 Topics
-
Where and how glass is used today3 Topics
-
State of glass waste and recycling3 Topics
-
Collection systems and actors3 Topics
-
Sorting, processing and making cullet3 Topics
-
Remelting, quality and markets3 Topics
-
Environmental, economic and policy aspects3 Topics
-
Practical implementation and teaching resources3 Topics
Participants 9


Designing a local pilot or lesson

travellingteacher256 April 13, 2026
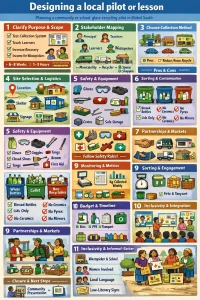
Designing a local pilot or lesson — stepwise checklist
Quick intro
This short checklist helps you plan a community or school glass‑recycling pilot or a single lesson that includes a hands‑on collection activity. It’s practical, low‑tech and crafted for Global South settings (think small towns, township schools, informal‑sector contexts). Use it as a blueprint you can adapt to local realities and partner capacities.
- Clarify purpose, scope and learning outcomes
- Purpose (choose one or more): test a collection system; teach learners the glass‑recycling process; increase local glass recovery; create income opportunities for wastepickers.
- Scope & scale: one classroom, one school, one neighbourhood, one market area.
- Timeframe: typical pilot = 6–12 weeks; one lesson or field activity = 1–3 hours.
- Learning outcomes (examples): learners can describe the stages from collection → sorting → cullet; learners can run a simple collection and weigh/record glass; community understands benefits of recycling (energy, jobs, less litter).
- Stakeholder mapping (who to involve)
Identify people and organisations to invite, consult or inform:
- Core: school principal, teachers, learners; classroom representative.
- Waste & collection: local municipality, waste contractors, recycling company / glass furnace, bottle bank operator.
- Informal sector: wastepickers / reclaimers / buy‑back centre operators.
- Community actors: ward councillors, shop owners, spaza shops, market committees, church groups.
- Support partners: NGOs, TVET colleges, local business sponsors, health clinic (for safety/first aid).
- Roles to assign: champion/facilitator, data recorder, collection supervisor, safety officer, outreach lead.
Tips:
- Meet key stakeholders at the start. Recognise informal workers as partners and include them in planning.
- Map influence vs interest: who will support you, who could block you, who needs convincing.
- Choose collection method
Pick the method that fits local behaviour, density and logistics.
Options:
- Classroom/School bin: basic, supervised, low contamination.
- School bring‑in day: learners bring bottles from home once a week.
- Door‑to‑door collection: good in high‑density areas; needs volunteers/contractor.
- Drop‑off point / bottle bank: central, fixed, suitable near shops or community centres.
- Market/shop collection: collect from spazas, taverns, restaurants.
- Deposit‑return style (small incentive): can boost recovery but needs funding and record‑keeping.
How to decide:
- Density & distance: if long distances, prefer central drop‑off points.
- Contamination risk: in mixed waste systems, provide clear signage and supervised collection.
- Transport & scale: if you need frequent transfer, check for trolleys or small vehicles.
- Informal sector links: integrate existing pickers and buy‑back outlets rather than compete.
- Site selection & logistics
- Choose visible, accessible drop‑off sites with shelter from rain.
- Provide clear signage in local languages with pictures.
- Plan collection frequency (daily/weekly) and transport to recycler or storage.
- Identify safe storage: off the ground, covered, labelled (clean glass vs mixed/contaminated).
- Arrange weighing: digital scale (0.1–50 kg) or balance scale; if no scale, use count × average weight per bottle as an approximation.
- Safety & equipment basics
Safety first — handle glass carefully, especially broken pieces.
Minimum PPE and tools:
- Heavy leather or cut‑resistant gloves.
- Closed‑toe sturdy shoes.
- Safety goggles for sorting area.
- Brooms, dustpans, stiff brushes, shovels.
- Stackable plastic crates or fiberboard boxes (no sharp metal bins).
- Heavy‑duty sacks/silos for whole bottles.
- Small scale (0–50 kg) and clipboards or data sheets.
- First‑aid kit with antiseptic, wound dressing, and tetanus advice.
Safety rules:
- No bare‑handed sorting of broken glass; use tongs or gloves.
- Keep children away from sorting broken glass; supervise school activities.
- Clean up spills immediately; label “broken glass” containers.
- Train participants on sharps handling and basic first aid.
- Encourage tetanus vaccination where possible and inform parents.
- Sorting, contamination control and quality
Simple sorting categories:
- Whole/closed bottles (collected separately).
- Whole/open bottles (rinse vs leave dirty).
- Broken glass/cullet (if accepted by recycler).
- Contaminated glass (ceramics, heat‑resistant glass, mirrored glass, stones) — these often cannot be recycled into container glass.
Quality tips:
- Ask participants to rinse and remove lids where feasible.
- Use pictorial posters to show acceptable vs unacceptable items.
- If recycler requires colour‑separated glass (clear/green/brown), plan separate bins — otherwise accept mixed glass if recycler can sort.
- Partnerships with recyclers / end markets
- Contact local recyclers early: they’ll advise on acceptable materials, required cleanliness, and transport minimums.
- If no local recycler, connect with regional consolidation centres or buy‑back centres.
- Agree on collection frequency, price (if paid), and who covers transport.
- Discuss whether the recycler will accept mixed‑colour cullet or needs colour separation.
- Training, engagement and communications
Short training topics:
- Why recycle glass? (benefits: reduces litter, saves energy, creates jobs)
- What to collect and what not to collect.
- How to sort and handle safely.
- How to weigh and record data.
Community engagement:
- Use demonstrations, posters, quiz games and competitions (e.g., class vs class).
- Include short videos or photos showing the remelting process.
- Offer small incentives: certificates, a class reward, or shared income reinvested in school materials.
- Keep messaging inclusive: respect livelihoods of informal workers and frame pilot as complementary.
- Monitoring, simple metrics & data collection
Keep metrics small and clear — these are useful for learners and assessing success.
Core indicators (simple):
- Mass of glass collected (kg) per week.
- Recovery rate (%) = (mass collected during pilot) / (estimated mass of glass waste generated in area or by learners). For small lessons, use number of bottles collected per learner.
- Cullet share (if you control furnace feed) = mass of cullet used / total glass input × 100% — usually for industry-level pilots only.
- Contamination rate (%) = mass of unacceptable/non‑recyclable material / total mass collected.
- Participation rate = number of participants / total target population.
- Safety incidents = number of cuts or accidents.
Sample data sheet (daily):
- Date | Collection point | # participants | Weight (kg) | Weight broken (kg) | Contamination (kg) | Notes
Simple calculations:
- Average kg per learner per week = total kg collected ÷ number of learners participating.
- Recovery rate (example) = (total kg collected over pilot ÷ estimated total glass waste generated in same period) × 100.
- If estimated generation unknown, use a proxy: 0.5–1.5 litre bottles per person per week depending on context — better to collect local baseline by asking households.
- Budgeting and resources
Costs to anticipate:
- Bins/crates, sacks, scales.
- PPE (gloves, goggles), signage, printing.
- Transport (fuel or allowances).
- Small incentives or refreshments for volunteers.
- Communication (posters, data sheets).
Keep costs small and transparent. Seek in‑kind support from municipality or local business.
- Timeline (example 8‑week pilot)
- Week 0–1: stakeholder meetings, site selection, agreements with recycler.
- Week 1–2: training, posters, set up bins, baseline data collection.
- Weeks 3–7: active collection, weekly weighing and reporting, mid‑pilot review.
- Week 8: final data collection, stakeholder debrief, community event to present results and next steps.
- Inclusivity & informal‑sector integration
- Recognise and respect existing wastepickers’ livelihoods. Invite them to participate and pay them fairly for clean loads.
- Consider women’s roles: ensure meeting times and locations are accessible.
- Make materials and signage in local languages and pictorial for low‑literacy contexts.
- Adapt tasks for different ages and abilities (e.g., no heavy lifting for younger learners).
- Risks, permits and waste policy
- Check local by‑laws for public collection points and signage.
- Liaise with municipality on transport of recyclables and permissions for public bins.
- Plan for rainy season and theft of bins.
- Keep records of agreements to avoid disputes.
- Closure, evaluation and next steps
- Hold a short community presentation of results (kg collected, participation, contamination, photos).
- Discuss sustainability: scale up, integrate into curriculum, link to a local buyer, or seek municipality adoption.
- Prepare 1‑page learner summary and share lessons learned (successes, challenges, recommendations).
Quick sample mini‑lesson plan (1.5 hours) — classroom + field trip
- 0–15 min: Intro: why glass matters — benefits & challenges (group brainstorm).
- 15–30 min: Show types of glass and recyclability (poster/game: “sort the items”).
- 30–60 min: Field activity — visit school bins or nearby shop, collect glass for 20–30 minutes.
- 60–75 min: Weigh and record collection; calculate kg per learner; discuss contamination.
- 75–90 min: Wrap up — safety recap, next steps, assign a small team to manage next collection.
Final notes — simple performance targets to aim for
- First 8‑week pilot: aim for consistent weekly collections and reduce contamination month‑on‑month.
- Participation: get at least 30–50% of target class or 10–20 households involved.
- Data quality: aim for >90% completeness of weekly logs.
- Safety: zero serious injuries; track minor incidents and correct causes.
If you want, I can:
- draft a one‑page learner summary based on this pilot plan,
- make printable posters (text you can paste into a printer template) showing “What to put in the glass bin”,
- or give a simple Excel template for data logging and automatic recovery‑rate calculations. Which would be most useful?