
-
Why glass matters: history and basics3 Topics
-
Where and how glass is used today3 Topics
-
State of glass waste and recycling3 Topics
-
Collection systems and actors3 Topics
-
Sorting, processing and making cullet3 Topics
-
Remelting, quality and markets3 Topics
-
Environmental, economic and policy aspects3 Topics
-
Practical implementation and teaching resources3 Topics
Participants 9


Processing to cullet

travellingteacher256 April 13, 2026
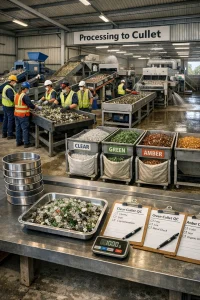
This topic walks through how waste glass is turned into clean, graded cullet ready for remelting — in plain language, with practical tips and classroom activities you can use with learners. Think of it as a step‑by‑step, low‑tech friendly guide that also points out the bigger issues in a real recycling plant.
Why good processing matters
Good cullet processing:
- Reduces furnace problems (less scum, fewer blockages).
- Improves product quality (colour, strength, clarity).
- Lowers energy use and emissions in remelting.
- Creates a valuable, saleable material instead of low‑value waste.
Even simple sorting and washing done well make a big difference.
Typical processing flow (simple view)
- Collection and delivery (bottles, jars, mixed glass)
- Manual pre‑sorting (remove large contaminants)
- Primary crushing
- Screening / sizing
- Magnetic and eddy‑current separation (remove metals)
- Air classification / density separation (remove light contaminants)
- Optical/colour sorting (if available)
- Washing and drying
- Final grading, storage and dispatch to the furnace
Below each step is explained in a way learners can see, touch or simulate.
Step‑by‑step, with classroom‑friendly notes
-
Collection and arrival
- Mixed loads arrive in bags, crates or trucks.
- First check for hazardous items (chemicals, syringes, lightbulbs) — these must be handled separately.
- Classroom activity: examine a small mixed sample and separate obviously hazardous items.
-
Manual pre‑sorting
- Workers remove broken ceramics, stones, metals, cookware, lighting glass, silicon sealant pieces, large plastics and rigid lids.
- This is often done on a conveyor or a table.
- Tip: train sorters to look for “wrong” glass types (e.g. borosilicate cookware, automotive glass) and for crown corks and metal lids.
- Safety: use cut‑resistant gloves and eye protection.
-
Primary crushing
- Crushers (jaw crushers, hammer mills or roll crushers) break glass into smaller fragments.
- Purpose: make material uniform and suitable for screening and removal of contaminants.
- Classroom demo: crush a small number of clean bottles in a covered, safe container (or show video) to discuss fragment shapes and sizes.
-
Screening and sizing
- Vibrating screens or trommels separate fines (dust and small particles) from coarse cullet.
- Typical outputs: fines (used for sand/aggregate in some places or disposed), standard cullet sizes for remelt.
- Why size matters: furnaces and feeders prefer a certain particle size distribution to feed evenly and melt predictably.
-
Magnetic separation
- Removes ferrous metals (steel caps, nails).
- Simple test you can teach: pass a strong magnet over a sample — anything attracted is ferrous and must be removed.
-
Eddy‑current separation
- Removes non‑ferrous metals (aluminium crowns, foil).
- Uses a magnetic field to eject non‑ferrous metals from the glass flow.
-
Air classification and density separation
- Blowers or air tables remove light contaminants (paper, labels, plastics).
- Some facilities use density methods to separate heavier contaminants (ceramics, stones) from glass — but this equipment is more advanced.
-
Optical / colour sorting (if available)
- Sensors (visible light / NIR) detect and separate glass by colour and spot non‑glass contaminants.
- Colour sorting is crucial for bottle‑to‑bottle operations (clear vs green vs amber). Even a little wrong colour can change the final product.
-
Washing and drying
- Removes organic residues (food, labels, adhesives), and dust.
- Washing can be done with water and mechanical scrubbing; detergents and heated water improve label removal.
- Drying reduces moisture — wet cullet can cause steam in the furnace.
-
Final grading, sampling and storage
- Cullet is bagged or stored in hoppers by colour and size.
- A sample is taken for quality checks before dispatch to the glassmaker.
Common contamination problems and simple solutions
-
Ceramics, stones and porcelain
- Problem: do not melt like container glass, create defects/scum in the melt.
- Solution: manual removal at pre‑sort; use screening and density separation; educate collectors to keep these out.
-
Heat‑resistant glass (borosilicate, some cookware)
- Problem: melts at different temperatures — small amounts can cause strain or defects.
- Solution: mark and remove during manual sort; public education to keep cookware/ovenware out of glass bins.
-
Lightbulbs, fluorescent tubes, and electronics glass
- Problem: can contain metals, coatings or gases; hazardous.
- Solution: divert to hazardous waste streams; public awareness; keep separate collection points.
-
Metal caps, crowns and closures (ferrous and non‑ferrous)
- Problem: can damage furnace and contaminate melt.
- Solution: magnets and eddy currents; hand removal during pre‑sort.
-
Label adhesives, food residues and organic contaminants
- Problem: cause foaming, smoke, scum.
- Solution: washing and mechanical scrubbing. Encourage consumers to rinse bottles where possible.
-
Mixed colours
- Problem: colour contamination affects final glass colour — clear (flint) glass is most sensitive.
- Solution: colour sorting and separate collection streams (clear vs coloured).
-
Plastics and paper
- Problem: create ash and scum, burn off in furnace.
- Solution: air classification, washing and manual removal.
Material specs that matter for remelting (what glassmakers check)
These are the key things foundries and glassworks care about. For teaching, present them as “must‑haves”.
- Purity (glass content)
- The cullet should be mostly glass; fewer non‑glass contaminants means better melt and product quality.
- Colour consistency
- For container manufacturing, separate streams for flint (clear), green and amber are usual.
- Particle size distribution
- Even feeding into the furnace matters; typical industry ranges vary by furnace. Cullet is usually graded into coarse and fine fractions.
- Moisture level
- Excess moisture causes steam and hazards; cullet should be dried as far as practical.
- Metal contamination
- Ferrous and non‑ferrous metals must be minimal; magnets and eddy current remove most.
- Inert/rocky contaminants
- Stones and ceramics must be very low or absent.
- Organic load
- Low levels of organics (food, adhesives) after washing.
Note: exact numeric limits vary by manufacturer and furnace. Encourage learners to ask local glassmakers for their remelt specifications.
Simple quality checks you can teach (no lab needed)
Set up a small QC station in class. Use these low‑tech tests:
-
Visual inspection
- Spread a 1‑kg sample on a tray; sort out obvious contaminants and estimate the % contamination by eye or weight.
-
Magnet test
- Run a strong magnet over the sample. Remove/collect ferrous items and weigh them; calculate ferrous mass %.
-
Hand colour sort
- Separate flint, green and amber and weigh each fraction. Calculate colour share percentages.
-
Screen test
- Use two or three household sieves (mesh sizes like ~25 mm, 10 mm, 3 mm) to show particle size distribution. Weigh each fraction to show what your cullet feed looks like.
-
Wash test
- Put a small sample in water and hand‑agitate. See what comes off (labels, residues). Dry and weigh to show moisture loss.
-
Contaminant count exercise
- Learners pick out contaminants for 5 minutes, then calculate number and weight % of contaminants in the sample.
These exercises teach the same thinking used at full‑scale plants: measure, remove, document.
Simple metrics to monitor (use in class and in small projects)
- Recovery rate: mass of glass collected / mass estimated in waste stream
- Cullet yield: mass of usable cullet after processing / mass of feedstock
- Contaminant fraction: mass of non‑glass contaminants / mass of cullet sample
- Cullet share in furnace batch: % cullet in raw feed (higher cullet share saves energy)
- Moisture (%): basic drying test (weigh wet vs dry sample)
A classroom task: students measure cullet yield and contaminant fraction for a 5 kg sample and discuss how to improve yield.
Safety and inclusive practice
- PPE: cut‑resistant gloves, safety glasses, dust masks, steel‑toe boots.
- Ergonomics: rotating tasks, rest breaks for manual sorters.
- Inclusion of informal collectors:
- Train and integrate them on sorting priorities.
- Provide protective gear and fair payment schemes.
- Use simple incentives (higher price for cleaner loads) to improve quality.
- Health: control dust (spray bars in washing lines), manage noise and machine hazards.
Quick teacher’s checklist (one‑page summary you can copy)
- Collect: label and separate clear/coloured streams if possible.
- Pre‑sort: remove obvious non‑glass and hazardous items.
- Crush: use safe enclosure and describe size targets to learners.
- Screen: remove fines and separate size fractions.
- Remove metals: magnet + eddy current if available.
- Clean: wash to remove labels/food; dry before storage.
- Sort by colour: essential for container remelt.
- Check: visual check + magnet test + sieve test on every load.
- Record: keep simple logs — % contamination, cullet yield, moisture.
- Safety: PPE for everyone; training for informal workers.
Final tips for educators
- Use hands‑on samples — learners grasp contamination issues quickly by touching and sorting.
- Invite a local plant or cooperative to demonstrate a conveyor or crusher (many facilities appreciate outreach).
- Emphasise local realities: in many Global South contexts manual sorting and the informal sector play a big role — teach realistic, low‑cost solutions.
- Encourage learners to contact a local glassmaker if they want exact specs — furnace operators set the numeric contamination limits and preferred sizes.
If you’d like, I can:
- Turn the “teacher’s checklist” into a printable one‑page handout.
- Create a short classroom activity sheet with step‑by‑step assessments and scoring for learners.